
Step-by-Step Guide: How to Produce LED Strip Lights Efficiently
- 2024-04-17 13:53
- UNITOP
Welcome to our comprehensive guide on producing LED strip lights efficiently! If you're a lighting enthusiast or a professional seeking to enhance your knowledge, you've come to the right place. In this step-by-step guide, we'll walk you through the entire process of manufacturing LED strip lights, from start to finish. So, whether you're curious about how these mesmerizing lights are made or you're considering venturing into the LED lighting industry, this blog post has got you covered.
Now, let's shed some light on the fascinating world of LED strip light production. Have you ever wondered how these versatile and energy-efficient lights come to life? From the initial concept to the final product, the journey is a meticulous and intricate one. In this guide, we'll unveil the secrets behind the manufacturing process, revealing the techniques and materials used to create these illuminating wonders.
Before we delve into the nitty-gritty details, allow me to introduce myself. I'm Tom, and I've been deeply immersed in the LED lighting industry since 2005. Over the years, I've gained extensive knowledge and hands-on experience in LED technology, making me your go-to source for all things LED strip lights. Drawing from my expertise, I've meticulously crafted this blog post to provide you with a comprehensive understanding of the production process, ensuring you're equipped with the knowledge to produce LED strip lights efficiently.
So, whether you're a curious enthusiast or a seasoned professional, this guide will equip you with the insights and techniques needed to excel in the world of LED strip light production. Let's dive right in and unravel the secrets behind creating these mesmerizing lights that have revolutionized the lighting industry. Get ready to embark on an illuminating journey that will leave you enlightened and inspired. Let's get started!
Understanding LED Strip Components

The primary elements that constitute an LED strip light include the Printed Circuit Board (PCB), numerous Light Emitting Diodes (LEDs), resistors, cables, and other waterproof parts if need be. This combination ensures that electrical signals are efficiently transformed into luminous output. Moreover, these components are carefully selected and arranged to provide a uniform light distribution and to maintain the integrity of the electrical circuit over the length of the strip.
Precision in component integration is vital to the strip's performance, specifically in terms of color consistency, light output, and durability. High-quality soldering and embedding processes are employed to secure the components to the PCB, ensuring that the strip operates at optimum efficiency and longevity.
Selection of LED Chips
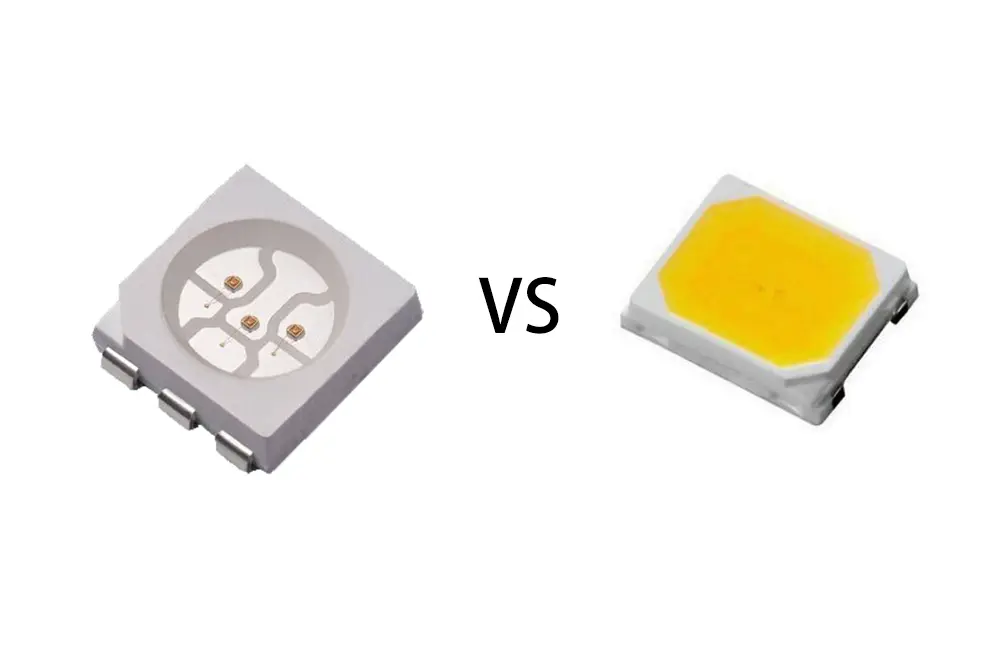
The heart of any LED strip is its array of semiconductor diodes, emitting visible light when electrified. Precise selection guarantees consistent color temperature and brightness across the strip. This meticulous process involves evaluating chip quality and performance metrics to ensure superior light emission and lifespan.
For optimal illumination, chips are categorized based on luminance, color rendering index (CRI), color temperature, and forward voltage. Engineers favor "binning" to group diodes with similar characteristics, thereby achieving uniform light output along the strip and minimizing color variances.
LED chips typically consume less power for the same brightness compared to traditional lighting technologies.
A stringent quality control regimen is adopted after the selection of LED chips. Each diode undergoes rigorous testing for color accuracy, intensity, and defects. Only after passing these tests are the chips soldered onto the PCB, ready for integration into the final LED strip design. This ensures that each segment emits consistent, high-quality light.
Types of PCBs for Strips
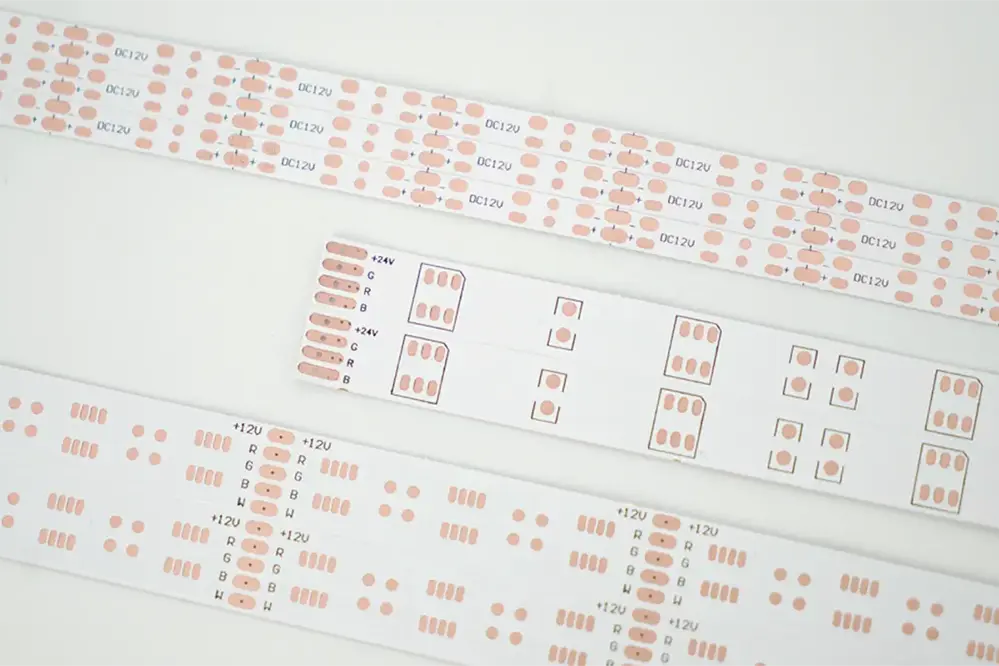
Printed Circuit Boards (PCBs) serve as the backbone for LED strip lights, influencing both thermal performance and flexibility.
- Flexible PCBs (FPCBs): Typically made from flexible materials like polyimide, allowing for bending and shaping around curved surfaces.
- Rigid PCBs: Made from solid materials such as fiberglass, which provide a sturdy base ideal for high-power applications.
- Hybrid PCBs: Combining flexible and rigid elements, these PCBs offer versatility for complex lighting installations.
- Aluminum Backed PCBs (Metal Core PCBs): Excellent for heat dissipation, making them a top choice for high-intensity LED applications.
The choice of PCB material affects the LED strip's applicability and durability in various environments.
Advancements in technology continue to diversify the types of PCBs available, catering to a wider range of lighting solutions.
Choosing the Right Resistors
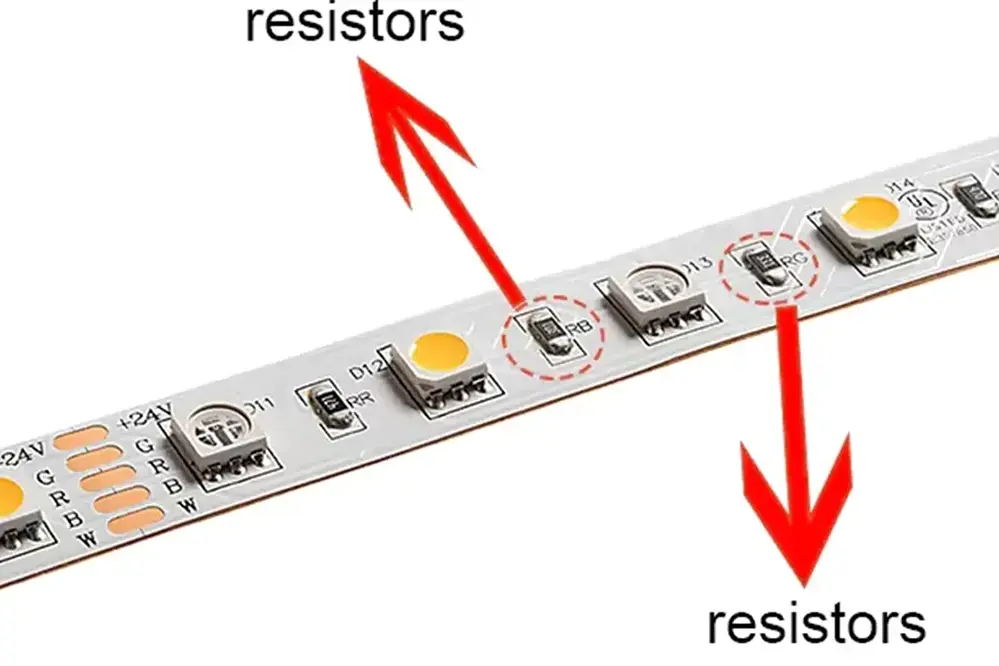
Resistors are essential in maintaining the integrity and performance of LED strip lights.
- Determine the supply voltage and the forward voltage of your LEDs.
- Calculate the required resistance using Ohm's law: Resistance (R) = (Supply Voltage (V_s) - LED Forward Voltage (V_f)) / Current (I).
- Choose resistors with a power rating that can handle the calculated wattage.
- Consider the tolerance of resistors, aiming for a tighter tolerance to ensure consistent light output.
- Opt for resistors with a higher temperature coefficient for better stability under varying thermal conditions.
A precise resistor selection is crucial to ensure the longevity and reliability of the LED strip.
It is worth investing in quality resistors to prevent inconsistencies in brightness and color over time.
Designing the LED Strip Layout
The LED strip layout must be meticulously planned to guarantee uniform illumination and efficient circuitry. The positioning of each LED, the circuit pathways, along with the thermal management design, are critical factors. They must be optimized to balance aesthetic appeal with functional performance, considering the intended application and installation environment.
A well-designed layout will also take into account the electrical parameters of the LEDs to determine the appropriate spacing and configuration. It ensures that the resultant LED strip light meets the specific brightness and power requirements while maximizing the PCB real estate.
Sketching Circuit Patterns
Circuit pattern design underpins LED functionality.
To sketch the circuit patterns for LED strip lights, a thorough understanding of current flow and voltage requirements is fundamental. The circuit design needs to take into account the number of LEDs, their arrangement, resistor placement, and power supply specifications. Additionally, consideration for the width of copper tracks is vital to handle the current that will pass through the LED strip, ensuring efficiency and safety.
Paths for electrons must be carefully planned.
In the creation of these patterns, sophisticated software is typically utilized. It helps to map out precise lines and spaces that define the electrical connections on the surface of the Printed Circuit Board (PCB). The accuracy of these patterns is critical, as a minute discrepancy can compromise the entire strip's functionality.
The process entails precision etching onto PCBs.
Finally, a step-by-step etching process meticulously removes unnecessary copper, leaving behind the planned circuit pattern. This procedure demands acute attention to detail; the slightest deviation can cause malfunctions. As of early 2023, advanced etching technology ensures that these patterns are replicated with high fidelity, contributing to the reliability of the finished LED strips.
Calculating LED Spacing
Precise LED spacing is crucial for consistent luminance and color mixing. This ensures an even distribution of light and a uniform appearance across the strip.
To determine the optimal LED spacing, one must consider the type of application and desired lighting effect. For general illumination or accent lighting, wider spacing may be sufficient, whereas task lighting or intense color washes might necessitate closer LED placement. This decision influences both the aesthetic and functional quality of the lighting installation. Parameters such as the angle of emission and luminous flux of individual diodes are also essential considerations in this calculation.
Moreover, LED spacing affects heat dissipation within the strip. Adequate space between diodes prevents excessive thermal buildup, which can diminish lifespan and efficiency. Carefully balancing luminous output with the strip's thermal management capabilities is critical in maximizing the strip's performance and durability.
In practice, expert calculations involve factoring in LED efficiency, light output (measured in lumens), and the maximum permissible temperature for the LED strip components. To formulate the ideal spacing, designers employ electronic design automation tools that simulate thermal and lighting scenarios. This ensures that the end product provides consistent luminosity, aesthetic appeal, and reliability over extended periods, counteracting premature deterioration due to thermal stress.
Assembling the LED Strip
Once the layout for optimal diode spacing has been finalized, the assembly of the LED strip commences with precision and attention to detail. The process begins with the preparation of the flexible printed circuit board (PCB), onto which an automated SMT (Surface Mount Technology) machine places each LED and other electronic components. It is imperative at this stage to ensure that the orientation and polarity of the LEDs are correct to avoid functional discrepancies. The PCB then moves through a reflow soldering oven where the components are permanently affixed to the board. After soldering, the strips are subject to rigorous quality control tests, including electrical, brightness, and color consistency checks, to certify that each segment meets the stringent standards before moving further down the production line.
Mounting Resistors, LEDs on PCB by SMT Machine
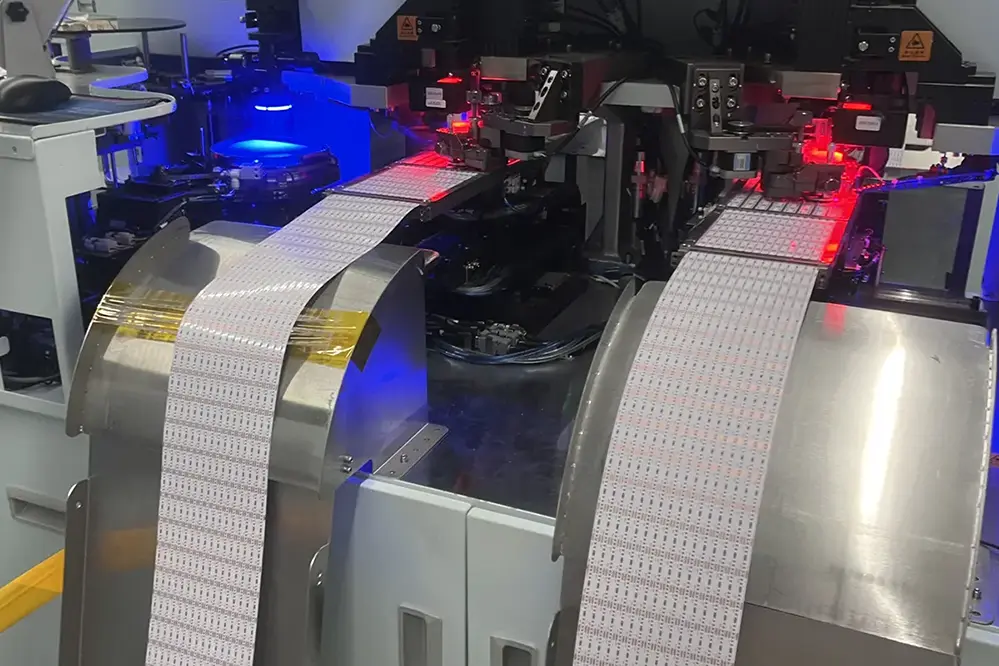
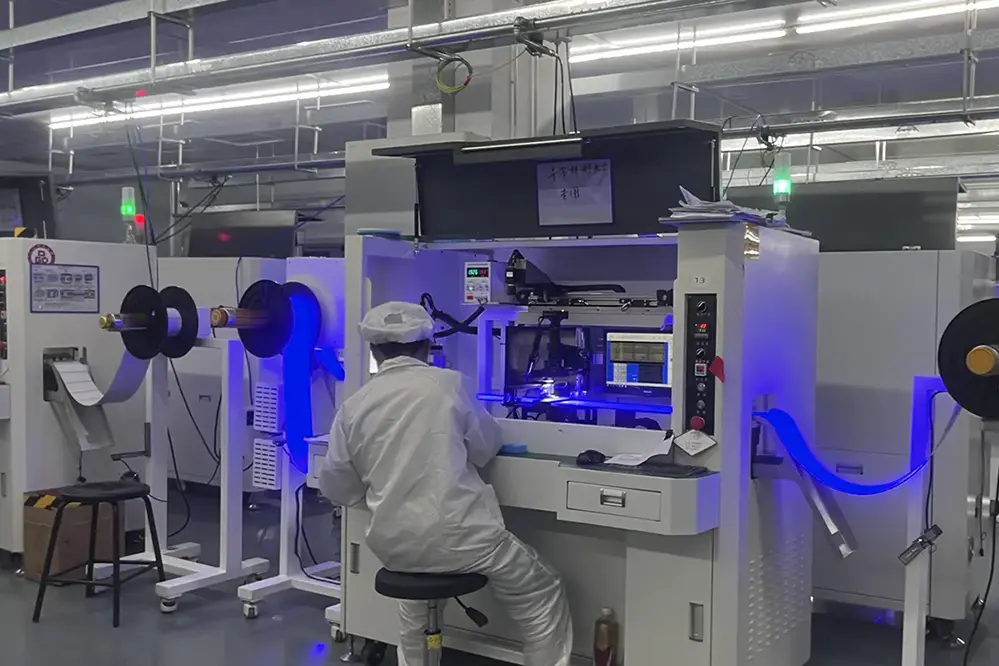
Surface Mount Technology (SMT) machines initiate component assembly.
Efficiency and precision define the SMT process. Reels loaded with Surface-Mount Devices (SMDs), containing LEDs and resistors, are fed into an SMT machine, which precisely places each component onto the PCB. Using high-speed robotic arms, components are placed with micrometer accuracy, ensuring flawless circuit assembly. Careful programming is essential to maintain the integrity of the light strip.
SMT machines handle thousands of components per hour.
The SMT process employs sophisticated programming. This allows for adjustments to the placement and soldering of different component types, optimizing the production process and reducing error margins. Manufacturers streamline assembly by integrating advanced vision systems within the SMT machine to verify component placement and orientation.
Soldering Components Together by Reflow Soldering
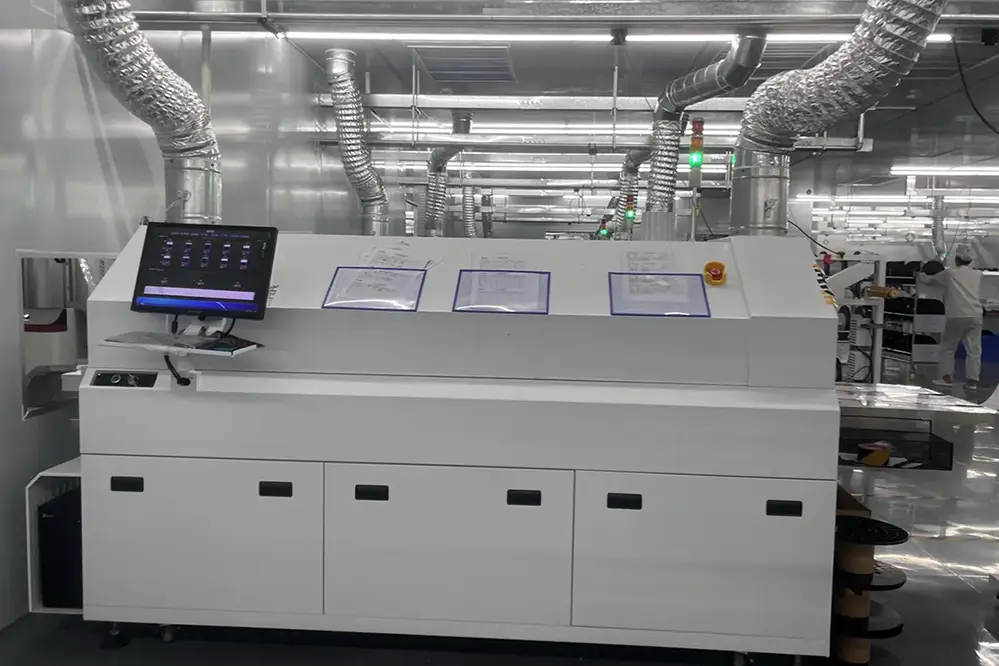
Reflow soldering is a pivotal stage, where the PCB assembly gains electrical functionality. Once components are accurately placed by the SMT machine, they must be permanently affixed to the PCB. This is achieved through the application of heat which melts solder paste initially applied during the SMT process.
Heating and cooling cycles are critically managed. This step ensures that all components make a secure and reliable connection to the PCB without damaging sensitive elements. A conveyor belt transports the assembly through a controlled reflow soldering oven with precise temperature zones set to optimally melt the solder.
With the completion of this process, each component forms a solid electrical bond. The point at which solder melts and solidifies, known as the 'reflow', is within a narrow temperature range to avoid any damage to the LEDs, resistors, and the PCB itself. Components are now permanently soldered, and the assembly exhibits assured conductivity and structural integrity.
Careful inspection follows to guarantee the soldering meets stringent quality standards. The reflow oven's heat profile is tailored to accommodate the specific melting points of the solder paste used, resulting in a robust and homogeneous electrical connectivity throughout the LED strip. Any imperfections, such as "bridges" between connections or insufficient soldering, are identified and rectified at this stage to ensure the reliability and performance of the LED strip lights.
AOI Test
The AOI test is an integral step in quality assurance for LED strip lights.
During this phase, an automated system swiftly scans each LED chip with high precision. It employs advanced vision algorithms to detect any functional defects or anomalies that may compromise the integrity of the strip.
This meticulous process is paramount, as it validates the operational consistency of the LED chips before proceeding further. It is a non-contact test, which ensures that the delicate components are not subjected to physical stress or damage.
Through high-resolution cameras and specialized software, defects such as non-lighting LEDs, color variations, and brightness inconsistencies are identified. A report is generated for each strip detailing any issues that need to be addressed.
Any LED strip that fails the AOI test is either rectified, if possible, or rejected to maintain stringent quality standards.
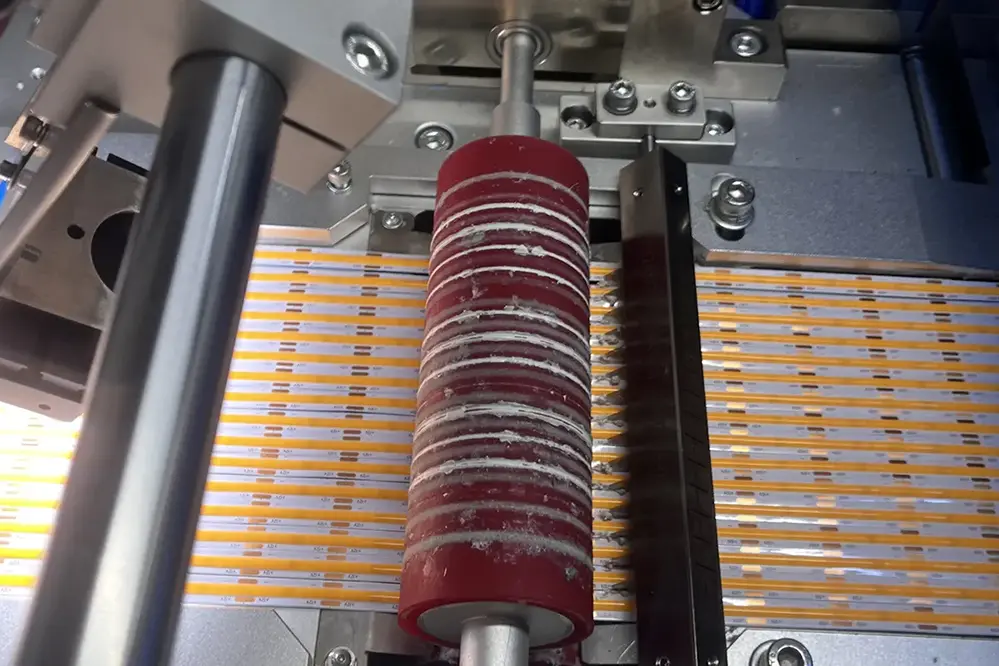
Put Adhesive Tape on the Back of the FPCB
Attaching adhesive tape to the FPCB (Flexible Printed Circuit Board) necessitates precision and uniformity to ensure optimal adhesion and ease of installation.
- Select the appropriate adhesive tape that matches the FPCB's width and provides strong, durable bonding.
- Clean the FPCB surface thoroughly to remove any debris or contaminants that could hinder adhesion.
- Apply the adhesive tape evenly along the FPCB, avoiding any wrinkles or air bubbles that could affect the final product's quality.
- Use automated equipment for the tape application, if available, to enhance consistency and throughput.
The adhesive backing is critical, as it secures LED strip lights to various surfaces, from under-cabinet areas to intricate display setups.
Once the tape is applied, a quality inspection is crucial to ensure the tape's bond will hold effectively under different environmental conditions.
Wire Soldering
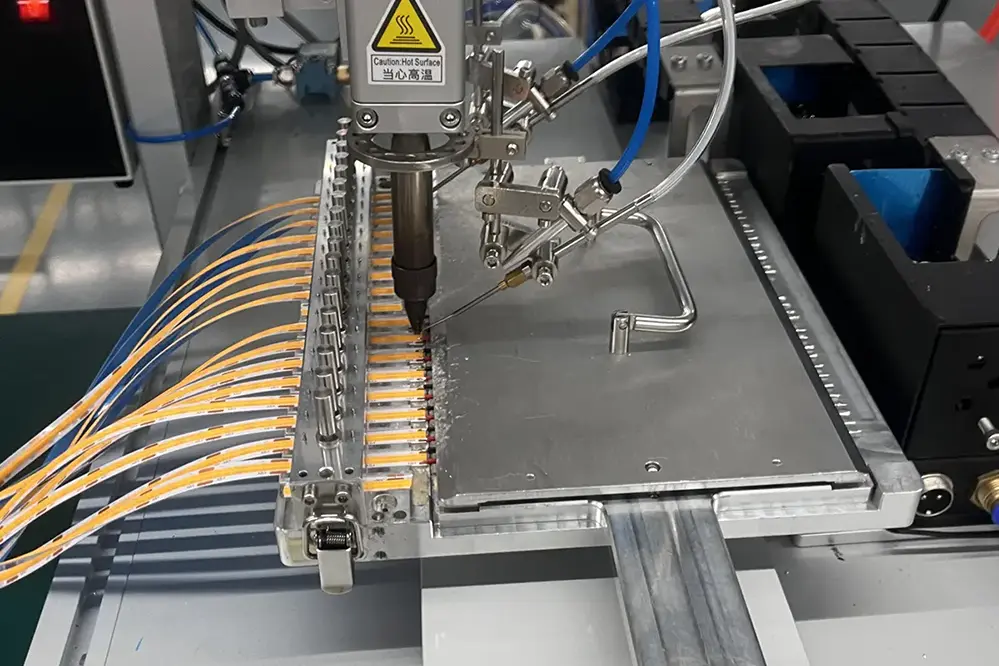
Wire soldering is a pivotal step in assembling LED strip lights, requiring both skill and precision.
- Precisely cut the wire to match the required length, ensuring there is enough wire to create a solid connection but not so much as to cause overcrowding or short-circuiting.
- Strip the ends of the wire, typically about 3-4mm for standard LED strip connections, exposing the conductive material needed for creating the solder joint.
- Pre-tin the wire ends and the solder pads on the FPCB; this involves applying a small amount of solder to prepare the surfaces and ensure a stronger bond.
- Align the wire to the corresponding pad, taking care to place the pre-tinned sections in direct contact.
- Heat both the wire and the pad simultaneously with a soldering iron, and gently apply solder until it flows and creates a smooth, dome-shaped joint.
- Inspect the solder joint for any cold solder or weak spots, which can lead to electrical failures or intermittent connections.
Proper soldering is crucial for the longevity and reliability of the LED strip's electrical connections.
It's imperative to maintain the right soldering temperature and to use flux if necessary to prevent oxidation and ensure a clean, strong bond between wire and FPCB.
Separate LED strips and Reel Them to be 5M or 10M/reel
Once individual LED strips are tested for quality assurance, they are cut to standardized lengths. Reliable cutting machinery facilitates precision, ensuring strips are cut accurately to either 5 or 10 meters to meet consumer preferences and industry standards.
Subsequently, these segments are manually wound onto reels. This reeling process allows for easy packaging and distribution, ensuring the strips remain untangled and protected during transport.
After the cutting of LED strips into the desired length, an essential step is the alignment onto reels. Workers carefully guide each strip, avoiding any twists or kinks, onto reels in a controlled manner that guarantees the LEDs are neither damaged nor subject to undue stress.
Finally, the LED strips are neatly wound onto reels through an automated reeling machine which ensures consistent tension and alignment. Each reel is then inspected to ensure the LEDs are properly seated and that there is no damage. Quality control during this process is critical; a mishap could lead to significant wastage and increased costs due to returns or the need for rework. With meticulous attention, the strips are prepped for "next-stage" processes like encapsulation or direct packaging.
Testing and Quality Assurance
Upon completion of reeling, rigorous testing begins to certify the LED strip lights' performance and durability. This involves a series of continuous-run cycles, simulating actual usage conditions to uncover any potential failure points early on.
In addition to longevity tests, electrical and photometric parameters are assiduously measured against pre-established benchmarks. These include color consistency, luminosity, voltage stability, and power draw; ensuring each strip meets stringent quality control protocols before being certified for distribution.
Safety also plays a pivotal role, with strips undergoing compliance checks for temperature resistance, and adherence to international safety standards. Only after passing these multifaceted assessments are the LED strip lights deemed ready for the market.
Conducting Electrical Tests
Ensuring the reliability of LED strip lights necessitates comprehensive electrical testing at this production stage.
- Voltage Tests: Confirming the operating voltage is within specified limits.
- Current Measurements: Verifying current draw aligns with design parameters.
- Continuity Checks: Detecting any open circuits along the LED strip.
- Insulation Resistance Tests: Assessing the insulation's effectiveness in preventing shorts.
- Dielectric Strength Tests: Evaluating the strip's ability to withstand high voltages without breakdown.
- Electromagnetic Compatibility (EMC) Testing: Ensuring the strip does not emit excessive electromagnetic interference.
These tests help in identifying any electrical anomalies that could compromise performance or safety.
Subsequent correction of identified issues is imperative to uphold product integrity.
Final Performance Check
After heat dissipation testing, we must perform the final performance check. This phase is the LED strip's litmus test, confirming the overall reliability and quality before products reach consumers.
At this juncture, heavy-duty tests stress the LED strips under extreme conditions simulating prolonged use. This includes rigorous on-and-off cycling, exposure to variable voltage levels, and extremes of temperature and humidity.
We closely monitor color consistency and brightness during the final performance evaluation. In our endeavor to deliver superior consistency, each batch undergoes spectral analysis to detect any deviation from specified chromaticity coordinates.
Equally, the adherence to electrical safety standards is uncompromisingly tested in the final check. Every LED strip is subjected to high voltage insulation tests to confirm their compliance with international safety benchmarks.
Once LED strips clear these exacting quality control stages, we confidently dispatch them. Thus, they embark on their mission to illuminate spaces, assured in performance and enduring in function.
Packing
Precision and care define the onset of the packing process for LED strip lights. Protective measures ensure the product's integrity until installation.
During the packaging, antistatic bags are used to safeguard electronics from potential static damage. Each LED strip is individually wrapped, guaranteeing extra protection during transit.
Meticulous attention then turns to the labeled information; it must accurately reflect the product's specifications and compliance details. Instruction manuals and installation guides are also included for end-user convenience.
Customized packaging options, such as blister packs or branded boxes, cater to varied client needs and enhance the product presentation. They also aid in the retail visibility of the LED strip lights.
Finally, the packed LED strips are sorted and placed into larger shipping cartons, ready for distribution. They are securely sealed, stacked on pallets, and prepared for departure.
Conclusion
LED strip lighting is a versatile and transformative lighting solution that requires precision and expertise in its crafting. From selecting premium materials to meticulous assembly processes, each step is crucial in ensuring quality. Ongoing advancements in LED technology further enhance the popularity and adaptability of these lights. Thorough testing procedures and resilient packaging ensure compliance with industry standards and readiness for market demands. With its synthesis of engineering and aesthetics, LED strip lighting is not just a strip of lights, but a streak of innovation poised to brighten spaces well into the future.
In the world of LED strip lighting, partnering with a trusted and professional manufacturer is key to achieving exceptional results. If you're looking for top-quality LED strip lights and LED neon strip solutions, look no further than Unitop. With their extensive experience and expertise in the industry, Unitop is dedicated to delivering innovative and reliable lighting products that meet the highest standards. Whether you're an individual seeking to enhance your living space or a professional in need of lighting solutions for large-scale projects, Unitop has you covered. Contact Unitop today and let their team of experts illuminate your vision with their exceptional LED strip lights and LED neon strip offerings.